Showing posts with label Eclipse. Show all posts

Build with Gradle

Recently one of my friends asked me to explain what a build tool is and what is Gradle. So I thought of explaining it here and go much as further as I can go smoothly and neatly.

What is a software build ?

You write code for an application. Those are the source codes. Lets say its an android application and your write Java code. When you have done writing the code you will have to make a .apk file if you want to run it on an android device. The process of converting source code -> something deployable is called building. So building may include
  • Compiling process
  • Linking related files 
  • If your software depends on external .jars, programs or whateve, solve those dependecies
  • Package your software in a deployable manner (in this case to an .apk file) 
Build tools are the tools that can do those things.
Some good tools are
C -- make
Java -- Ant,Maven,Gradle
.net --NAnt

Do we need tools for building ?

If you are doing indpendant small scale coding, you dont any FANCY build tools. But when you have large scale developement to handle with lot of different people coding on different parts and you should have like different versions of builds for different reasons and they depend on diff third party plugins, software, files your life can be like living in hell if you dont have a build tool with you. But this not the case with interpreted programs coz interpreters dont involve a compiling process hence the interpreters ;).

What is Gradle ?

Gradle is a also a built autoamtion tool. Meaning you can automatically build your project into several builds and at the same time you can automate some tests also. So gradle is opensource and used at enterprise level which is more cool. I think it came to enterprise level just because it is opensource. Power of often source huh :D. Gradle has lot of good features of ant and Maven. Now you can build Java,C,C++ apps with gradle.

Gradle is built with a Groovy a good OO Java like scripting language. So all the gradle tasks are in Groovy and if you wanna do stuff with Gradle, you ll have to learn Groovy a lil bit. Its not that actually hard. Gradle came to popularity with the start of Android Studio. I remember when I worked with Android Studio and Gradle for the first time in 2 years back , Gradle was a crappy part of the studio with that greenish slimy logo and build scripts. But as it turns out, gradle has become a indipensable tool for me now. ;) Never judge a book by its cover, huh :D

So if you wanna start with gradle, you should have it in your system. Get with package managers or download binaries or install with ecplise. There are so much you can do with gradle but we will see most common reoccurring ones like jar configs, dependency management and configs.


gradle tasks

This can show you what you can do with gradle and are as follows.
Build tasks 
assemble - Assembles the outputs of this project.
build - Assembles and tests this project.
buildDependents - Assembles and tests this project and all projects that depend on it.
buildNeeded - Assembles and tests this project and all projects it depends on.
classes - Assembles classes 'main'.
clean - Deletes the build directory.
jar - Assembles a jar archive containing the main classes.
testClasses - Assembles classes 'test'.

Build Setup tasks
init - Initializes a new Gradle build. [incubating]
wrapper - Generates Gradle wrapper files. [incubating]

Documentation tasks
javadoc - Generates Javadoc API documentation for the main source code.

Help tasks
components - Displays the components produced by root project 'GradeDemo'. [incubating]
dependencies - Displays all dependencies declared in root project 'GradeDemo'.
dependencyInsight - Displays the insight into a specific dependency in root project 'GradeDemo'.
help - Displays a help message.
model - Displays the configuration model of root project 'GradeDemo'. [incubating]
projects - Displays the sub-projects of root project 'GradeDemo'.
properties - Displays the properties of root project 'GradeDemo'.
tasks - Displays the tasks runnable from root project 'GradeDemo'.

Verification tasks
check - Runs all checks.
test - Runs the unit tests.

Rules
Pattern: clean<TaskName>: Cleans the output files of a task.
Pattern: build<ConfigurationName>: Assembles the artifacts of a configuration.
Pattern: upload<ConfigurationName>: Assembles and uploads the artifacts belonging to a configuration.


apply plugin: "java" 

This will tell the gradle system that this is a Java project. So when build is done
source files will be in -> src/main
testing source files -> src/test
all your builds -> builds/lib


repositories{mavenCentral()}
dependencies {
compile  'org.glassfish.jersey.core:jersey-client:2.22.1'
runtime 'orf.groovy:groovy:2.2'
}
Gradle can reslove dependecy problems just like in Maven and pom.xml does. So when a dependency is declared it just downloads the dependecies when the build happens from a repo mentioned. Luckily we have a in built Maven repo comes with gradle ie: mavenCentral which has lot of dependencies. Or you can use Ivy whihc is like maven repo or custom define repos.
You can also specify the type of the dependency a compile time or run time. It should be in the format of Group id : artifact id: version number (ex: 'org.glassfish.jersey.core:jersey-client:2.22.1)

sourceCompatibility = 1.8
version = '2.5'
jar {
  manifest { 
    attributes "Main-Class": 'com.kapal.gradle.Main',
"Implementation-title":"Build with gradle"
"Implementation version": version
  }

We can  add attributes to Manifest.mf which is an information file which comes with built jar. You can add any attribute to the file.

configurations {
  
 customCompile
 customCompile.transitive = false
 compile.extendsFrom(customCompile)
 compile.transitive = false
 testCompile.transitive = false
    
}

You can add configure your build(s) add custom configs for build(s) and hanldle how your build happens and how your testing builds happen.
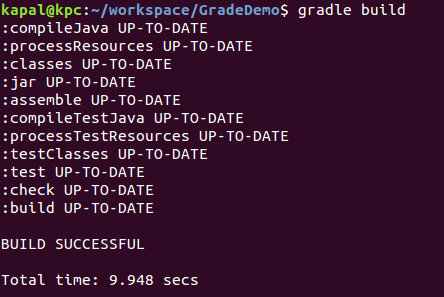
This is what you get when a succussfull build happens


Share:

Calling a remote SOAP WS (JAX-WS) from a local client

Lets say a some SOAP service is hosted in a remoter server. We dont want to know its implementation logic, language, platform, server or anything. Thats the beauty of WS. You can call it from any language, platform.

If you can google you can find loads of SOAP services for free. For now I will use http://www.webservicex.net/New/. This just a random choice. This site has loads of web services.

From all of those WS I will chose http://www.webservicex.net/New/Home/ServiceDetail/17. This can basically take a countries name as a string and provide its dialing code, currency, GMT like details.

So first step is to get it's WSDL.
Which is @ http://www.webservicex.net/country.asmx?WSDL

When you look at the end of the WSDL you can see this.


Which means 
Service name = country and its is binded  port = countrySoap

Before going to have a Java client we need to have all the stubs that complies with this WSDL.
we can do that via wsimport tool by JDK. Type this in a bash.

wsimport -keep http://www.webservicex.net/country.asmx?WSDL

-keep arg can keeps the .java files with .class files. What I normally do is after all the files parsed from the WSDL remove all the .class files via rm *.class 

So in our Java main method, we can have a instance of web service and get its binded interface which is at the above mentioned port and access all the web methods via the interface.


import net.webservicex.Country;
import net.webservicex.CountrySoap;

public class Main {

	public static void main(String[] args) {

		// According to WSDL service name is country
		// Create a web service instance
		Country country = new Country();
		
		// According to WSDL this service is binded to countrySoap port
		// So get this service's port
		CountrySoap cs = country.getCountrySoap();
		
		// Now we have the access to services interface
		// We can call its services 
		// We don't need to worry about in and out parameters and data types
		// They are being handled by stubs at client and server end
		// For now lets get the dialing number for any country
		String dialing = cs.getISD("Sri Lanka");
		
		System.out.println(dialing);


	}

}


Result

IMPORTANT
Actually this WS has 2 issues.
  1. It produces the result twice per each response.
  2. The result is not a native String type. It is wrapped around a table. we have to unwrap it first.

Any how Service implementation is beyond our duty and we can call the SOAP WS regardless.


underneath the communication media request is sent as a SOAP mag and response is also received as a SOAP msg.

We request

POST /country.asmx HTTP/1.1
Host: www.webservicex.net
Content-Type: application/soap+xml; charset=utf-8
Content-Length: length

<?xml version="1.0" encoding="utf-8"?>
<soap12:Envelope xmlns:xsi="http://www.w3.org/2001/XMLSchema-instance" xmlns:xsd="http://www.w3.org/2001/XMLSchema" xmlns:soap12="http://www.w3.org/2003/05/soap-envelope">
  <soap12:Body>
    <GetISD xmlns="http://www.webserviceX.NET">
      <CountryName>string</CountryName>
    </GetISD>
  </soap12:Body>
</soap12:Envelope>
We get

HTTP/1.1 200 OK
Content-Type: application/soap+xml; charset=utf-8
Content-Length: length

<?xml version="1.0" encoding="utf-8"?>
<soap12:Envelope xmlns:xsi="http://www.w3.org/2001/XMLSchema-instance" xmlns:xsd="http://www.w3.org/2001/XMLSchema" xmlns:soap12="http://www.w3.org/2003/05/soap-envelope">
  <soap12:Body>
    <GetISDResponse xmlns="http://www.webserviceX.NET">
      <GetISDResult>string</GetISDResult>
    </GetISDResponse>
  </soap12:Body>
</soap12:Envelope>


Share:

How to consume a local SOAP web service (JAX-WS) - Implementation

Lets continue with our example from here and keep things simple and tidy.

Lets say we have a server(A local server for now. ie. localhost). It has a service to add any two numbers. So you have a client who wants to consume that ws. Meaning he frigging needs to add two numbers.

Server side implementation

Add service

You need to have the service now. So write a simple add method in dynamic web project in eclipse. Its is a good idea to add the relevant annotations coz I find it less buggy.
package controller;

import javax.jws.WebMethod;
import javax.jws.WebService;

@WebService(serviceName="MyCalc")
public class Calculator {

 
 @WebMethod
 public int add(int num1, int num2)
 {
  return num1 + num2;
 }
}

WSDL creation

Create a new web service in the same project and create as follows.You can create the WSDL from your add implementation Or you can create the WSDL manually according to add method. ;) 


Deploy and run the web service

Now run the project on the server. Im hoping you have a server created already. And BTW without a server installed you wont be able to create the WSDL even. I have used WildFly 9 to deploy. If all is ok you will be able to see your WSDL at
http://localhost:8080/CalculatorWS/MyCalc?wsdl
[Note: Port and server names can be changed as to how you have configured your sever]

Client implementation

One important thing. Under your web project you -> web content -> wsdl directory you can see your wsdl and its design. So according to following design
MyCalculalator web service is binded to Calculator interface via CalculatorSoapBinding(that little box in the middle). So if we need to access the web service we can access it via Calculator interface which acts as a proxy.

Before we access the web service we need to have our own interface to act as a stub. This stub should also comply with the WSDL also. In a real scenario you ll have to get the WSDL from a UDDI.
So to create the related stubs we will use wsimport tool by JDK.

wsimport -keep http://localhost:8080/CalculatorWS/MyCalc?wsdl
[If you dont add -keep it will generate only .class file and remove the .java files]

Import those files to a normal Java project. So now these stubs are in the controller package.


Now you can access the WS in the main method. In the command line you can see your service call has been executed.

import controller.Calculator;
import controller.MyCalc;

public class Main {

 public static void main (String args[]) 
 {
  
  // Create a web service instance
  MyCalc mycalc = new MyCalc();
  
  // Access that service with the binded port
  Calculator c = mycalc.getCalculatorPort();
  
  // Consume the service via its interface/proxy
  System.out.println(c.add(54, 87));
  
 
 }
 }
Share:

How to consume a remote SOAP web service (JAX-WS)?

For the sake of explaining this scenario we will mix some theoretical aspects with a narration.
Disclaimer: This can be pretty stupid

Lets say this is the time where Mathematics hasn't been born yet. No cool mathematicians are born yet. But still you have numbers. So you dont know how to add or multiply or do anything with  the numbers. All of a sudden you need to add 2 numbers. Gladly there is a far far far away a machine that can add two numbers. So you are in luck.

That machine = Web service

Not so fast. You know that there is a such machine. But how the heck you can find it or frigging locate it. Just because you are such a lucky person, there is a wise old man in your villlage who knows all about every magical machinery crap that exist on this planet. So you can ask the directions to the adding machine.

Wise Old Man = UDDI

Just because you know the machine isnt mean that you can add 2 numbers. There is a specific way to present those 2 numbers to the machine and theres is a specific format that you get the result from the machine. Every machine has a manual ! So if you read the manual you can figure all about the machine.

Machine Manual = WSDL

Here you can parse the WSDL to have related stubs/proxies in 3 ways.

  1. Look at the WS and write the WSDL manually. Thats gonna be preeeeeety HARD.
  2. You can use an IDE like eclipse to do that. (3rd part tools)
  3. Use wsimport utility provided by JDK 6+ versions. https://docs.oracle.com/javase/6/docs/technotes/tools/share/wsimport.html [Note: wsimport <wsdl link> provides class files by deafult because after compilation it removes the .java files. If you want to have .java files add relevenat arguments to wsimport]
So once you know how to read the manual and hopefully you can understand the manual, you can operate it. Meaning you can add your two numbers.

This is just the basic of it. See how it is really done here.

Share: